Each scene in XSight RT must supply a sampler. The sampler is responsible of sending visual rays to the scene through the lens of the camera. Depending on the kind of sampler, it may send one or more rays for each pixel. That's because several rays by pixel are required to achieve antialiasing, focal blur and other effects. These are the samplers supported in this version:
There are two additional samplers: the draft sampler and the sonar sampler. These are special purpose samplers that cannot be directly instantiaded from a scene script.
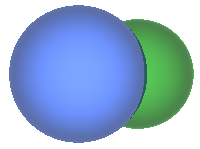
The basic sampler is the simplest. It only traces a ray for each pixel in the final image. It trades speed for quality. As the following image shows, object borders are jagged.
There are three ways to create a basic sampler:
The bounces parameter controls the maximum numbers of reflections and refractions for a single light ray before stopping the trace. The default value is 10. You should rise this value if your scene contains a lot of reflecting or transparent objects.
With each successive reflections or refractions, the intensity of a light ray diminishes. The minimumWeight parameters controls the lower intensity limit allowed for a light ray before halting the trace. Default value: 0.001.
The super sampler sacrifices some speed to smooth jagged edges. It starts rendering the same way as the basic sampler. However, the sampler checks the color difference between each traced pixel and its immediate neighbors. If the difference is higher than a threshold, the sampler traces four more points around the conflictive pixel. These additional points are shared by neighbors so, even in the worst case, you only need to render twice the number of pixels in the final image.
The threshold parameter is an integer value, and its default value is 16. The difference between the colors of two adjacent pixels is measured using a weighted version of the so called Manhattan metric.
The antialias sampler sends a configurable number of rays for each pixel in the image. Ray directions are choose with a random generator. Result quality is far better than with the "super" sampler.
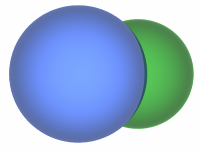
Actually, samples must be squared in order to know how many samples are taken for each pixel in the rendered image. XSight RT uses a technique known as stratified sampling, and it must distribute samples in a squared grid.
If you supply the minDeviation parameter, with each ray the sampler estimates the variance of the results and it stops sending ray as soon the estimation is lesser than minDeviation.
The adaptive sampler is a variation of the antialias sampler. A first special pass over the whole scene is performed, using only one ray by pixel. The number of bounces is limited to four, and the minimum weight is raised to 1/255. The image generated by this pass is applied a high pass filter, which helps identifying edges in the scene:
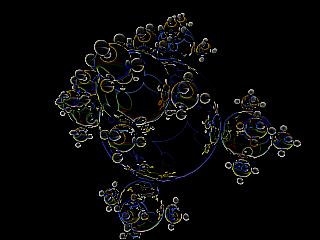
Note that the edge map marks not only the edges, but also sharp color transitions. For these points, the sampler will use the maximum number of samples. The rest of the image will be generated using the minimum number of samples.
To find the total number of pixels used by this sampler, move the mouse above the status bar when the generation is over:

The adaptive sampler accepts these parameters:
When minSamples is not specified, the sampler asummes it's 3. You can set minSamples as low as 1.
The focal sampler adds another variation source to the algorithm used by the antialias sampler: this time, both the ray origin and target are changed at random. The effect of moving the origin is very subtle, but easy to understand. If we don't move the origin, there are no changes in visibility. On the contrary, when the camera move, visibility may change with each ray. This is also the reason why focal blur is not realistically emulated by post-processing. This image shows what happens:
The blue box blocks the visibility of the orange box. If the camera is located at the origin of ray R1, the intersection point between R1 and the orange box is the leftmost visible point for that object. If we move the origin just a little, and then we trace another ray (R2),the new ray may reach previously hidden zones in the orange box. Note, however, that the size of the uncovered area is proportional to the distance from the camera position. Actually, the algorithm is more sophisticated: there most be no blurring for point located in the focal plane.
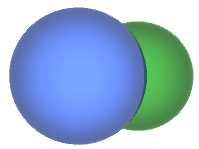
This is the effect of a focal sampler on our scene:
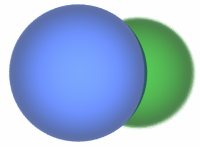
The second ball shows now a slightly blurred border, while the first sphere still has a neat border.
A focal sampler is configured very similarly to the antialias sampler, but it needs an extra parameter: aperture. The bigger the aperture, the most noticeable effect. If you use a zero aperture, the focal sampler behaves exactly as the antialias sampler does... except for efficiency. If you don't want to use a non-zero aperture, that is, if you don't want focal blur, you should use an antialias sampler.
There are two more sampler classes: the draft sampler and the sonar sampler, but they cannot be instantiated from a scene script. These special samplers automatically replace the sampler specified in a script when the user selects a render quality other than Optimal.
The draft sampler doesn't trace reflected rays and use a simplified version for materials and lights. This sampler needs no further configuration. On the other hand, the sonar sampler probes distances from the camera to object in the scene, and maps these distance to colors. There is a Sonar Mode Options pane in the Options dialog box for configuring this sampler.
Home | Small Instantiation Language overview | Scenes | Cameras | Lights | Ambient lights | Background | Predefined shapes | Materials